Open Project Room
As a member of the University of Hamburg, you are entitled to open a project room—such as a space for exchange within a seminar or as a workspace for your project. If you want to create a new room and learn some basic information about room moderation—such as how to assign other room members as moderators—this short tutorial is a great starting point for creating your own rooms.
Project rooms can be assigned to a community room when created. This way, relevant documents for all community members can be centrally uploaded without needing to post them in each individual assigned project room.
| Current Notice: To open a project room, please use your user ID from the University of Hamburg. This function is no longer available when logging in with local IDs that are only valid in CommSy. If you have both a user ID from UHH and a local ID, you can easily merge them at any time. For more information about your UHH user ID, please refer to to this page of the RRZ. |
1. Open a Room
As a CommSy user, you can create a new project room at any time. To do this, click on "Create New Room" on the dashboard. A form will open in which you can name your room and make general settings (Fig. 1). We strongly recommend including the relevant semester in the title for rooms related to courses, e.g., "Introduction to Literary Studies (WS 2023/24)," so that students can join the correct room, especially for recurring course types. If you leave the default template, your room will appear in the blue CommSy design. Additional information (semester, assignment, and description) is optional, but it is advisable to include them to better identify your room—this will make it more easily found through the search function. All data entered here can be changed at any time.
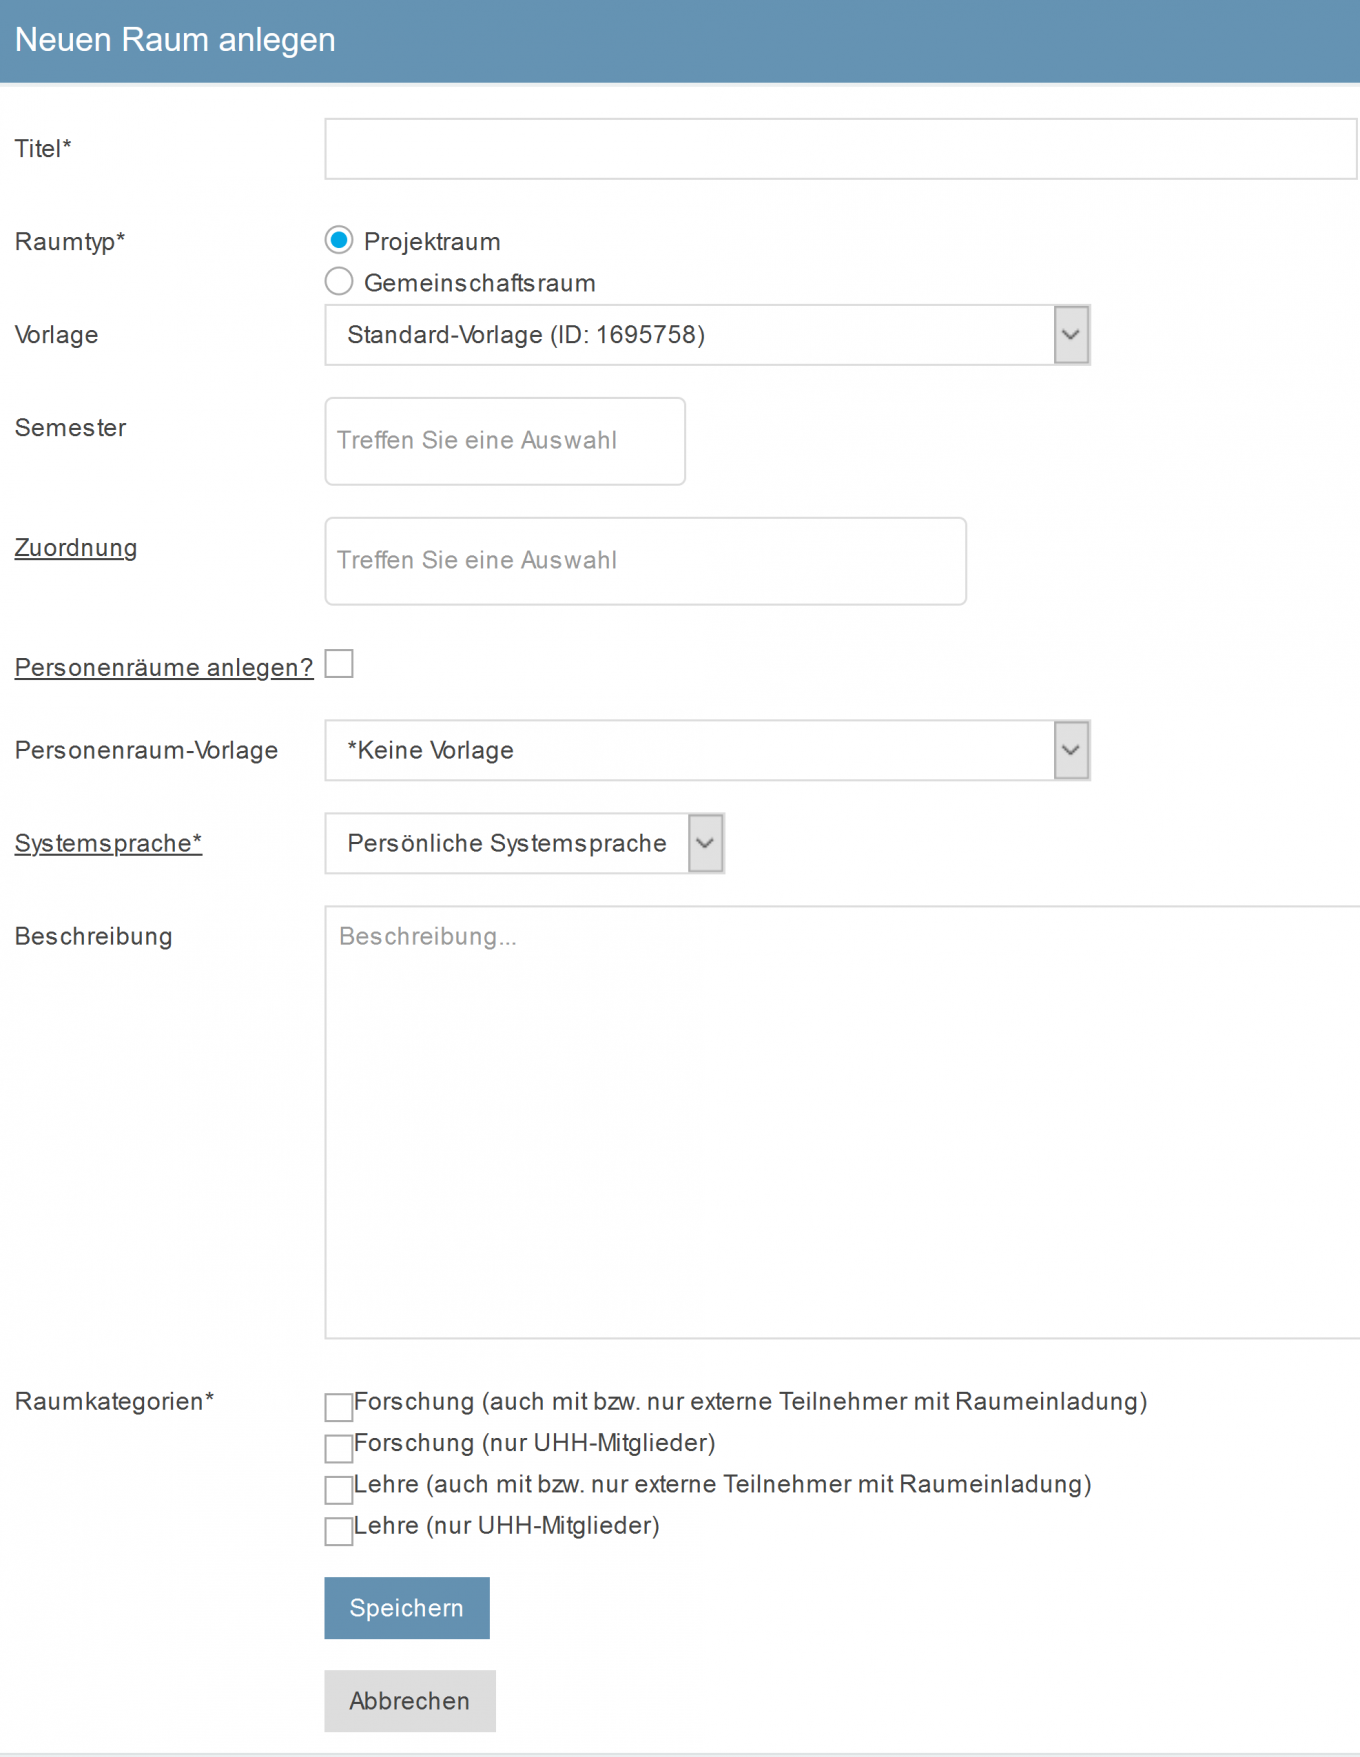
After clicking "Save," your room will be created. You will find it immediately in the room list under the title you chose.
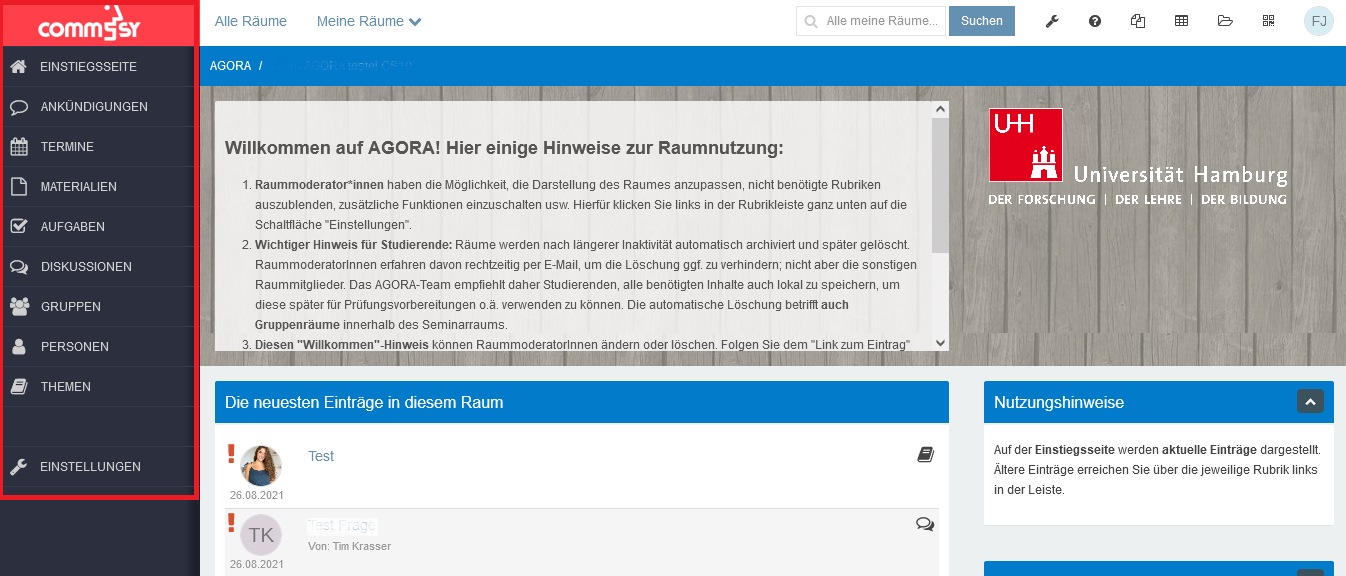
To enter the room, click on the name in the list. This will open the "Entry Page" of your project room, where you can see the latest activities at a glance. On the left, you can switch between the different sections of your room (Fig. 2). For example, by clicking on "Materials," you will access the area of the room where you and other participants can upload and comment on documents.
2. Moderation
Since you created this room, you have unrestricted access and are automatically designated as a moderator. This status is necessary for administrative tasks.
- For example, you can change the settings of the room or grant access to new members.
- You can also assign the moderator status to other room members, such as tutors, student assistants, or participants of a study group.
To do this, navigate to the "People" section via the section bar (Fig. 4).
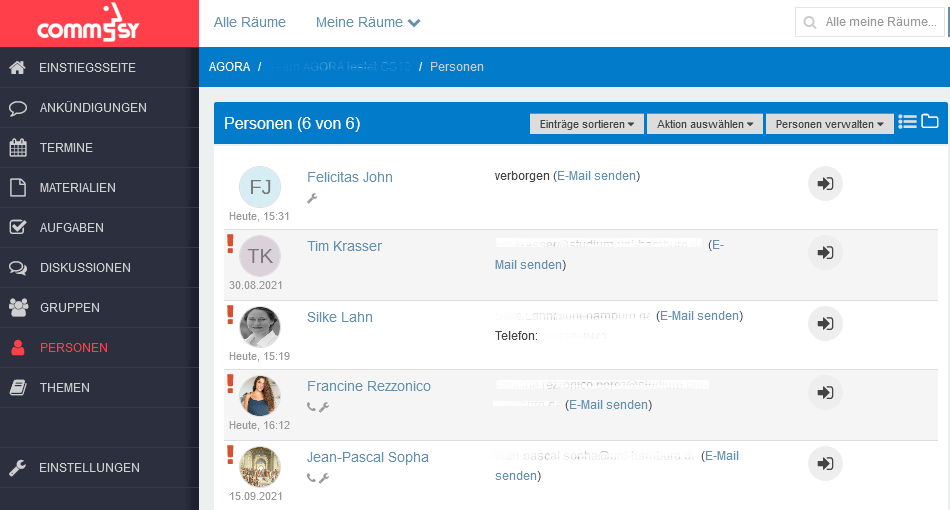
Here, you can change the status of one or more individuals by selecting the desired status from the drop-down menu "Select Action" and clicking the box to the left of the person's name. Confirm this by clicking "Execute Action."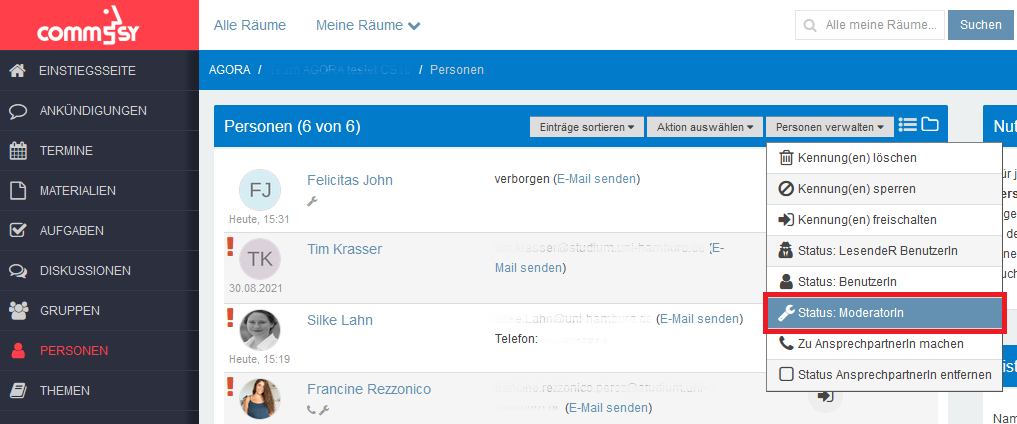
3. Unlock Participants
When you have created a room, it is initially closed to others. The participation setting is set to "always review." CommSy users can send a request to join by providing a reason for participation and will then be unlocked. Moderators receive the requests via email; these include a link that directs them to the approval page.
Here's how you can unlock requesting participants:
1. Enter the "People" section. Here, you will see a red-highlighted notice above the list indicating whether there are any user IDs currently pending approval (Fig. 6).
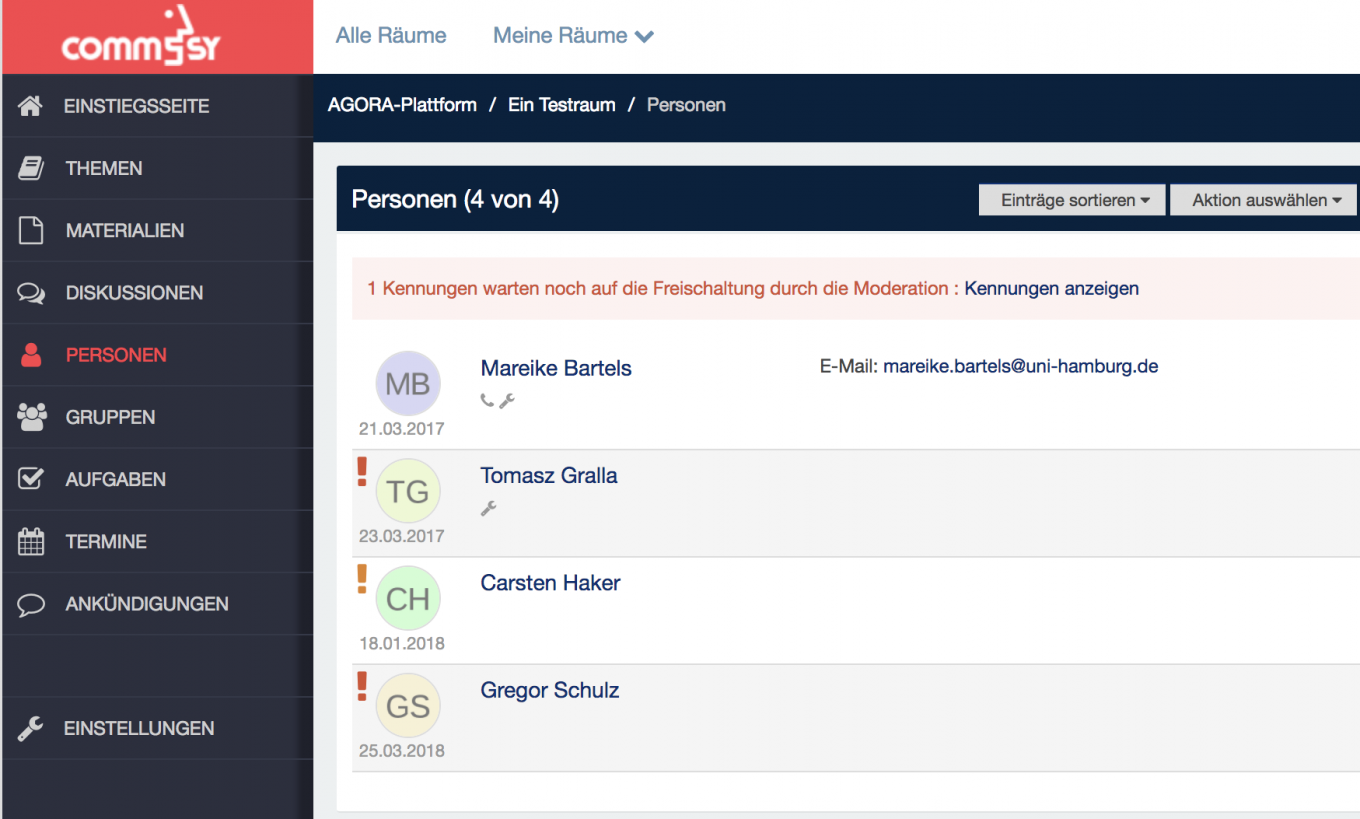
2. Click on "Show User IDs" in the red notice box (Fig. 6).
3. Now you will see only the user IDs pending approval, and you can easily unlock them by clicking the green button (Fig. 7).

If you want to unlock multiple people at once:
1. From the drop-down menu "Manage People" in the top right, select the action "Unlock User ID(s)" (Fig. 8).
2. Then, select the individuals to unlock by checking the box to the left of their names or by clicking "Select All Entries" at the top (Fig. 8).
3. Confirm the unlocking by clicking "Execute Action."
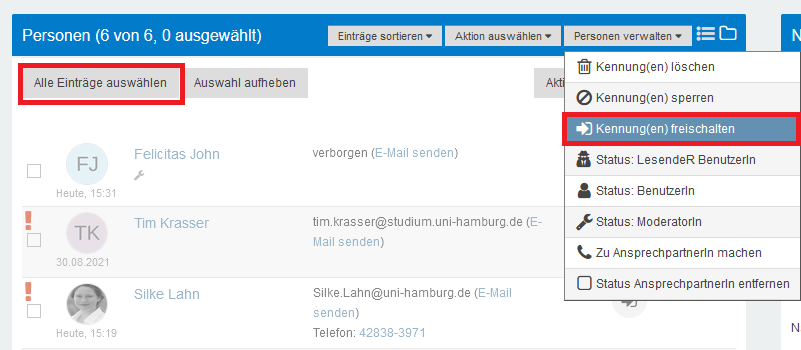
Once you have unlocked individuals, you must confirm the status change on the next page and specify whether the users should be notified by email.
| Note: Instead of manually unlocking participants, you can also set up a participation code or directly connect your STiNE course with CommSy, so that all participants are automatically added to your CommSy room. |
4. Change Status of Members
To effectively manage rooms, there is an option to assign different to the members of a room (Fig. 8).
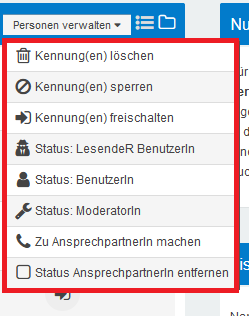
There are the following options in total:
Reading User
With this option, you significantly restrict the rights of the members of the room. If a user is set to "reading user," that person can only view the content of the room but cannot edit it. They will also not be able to create new entries.
User
This is the normal status that is set by default. The user can edit, download, or create content as usual.
Moderator*in
If you would like to delegate administrative tasks to other individuals, you can do so using this function.
| Attention: As a moderator, individuals have unrestricted rights regarding the management of the room. Only grant this status to people you trust. Also, be careful not to revoke your own status as a moderator. Once you are recorded as a regular user, only the new moderator can switch you back! |
Contact Person
These individuals are displayed in the room with the "phone icon". This signals to other members that they should contact this person in case of issues or questions. However, as a point of contact, users do not have administrative rights.
