Instructors Guideline
In this document, you will find the key steps for creating new courses summarized. If you find that any information is missing from this guide, please direct your feedback to: E-DL.OLAT"AT"uni-hamburg.de
Table of Contents
- Roles
- Course Overview
- Creating a Course
- Creating a Course Copy
- Course Editor
- How Do Participants Join My Course?
- Course Access via an Access Code
- Publishing the Course
- Course Info Page
- Who Can See My Course Content? Visibility and Access Configuration
- Checking Course Settings - Role Changes and Course Preview
- Member Management/Participant Management
- Creating a New Group within Member Management
- Ending or Deleting Courses
1. Roles
To represent complex learning scenarios in OpenOlat, the following are particularly relevant in everyday operations:
- Registered users, or in relation to a course, members or participants, are most often the students in your event. This is the basic of any account in OpenOlat. Participants can self-organize in self-created groups using a folder, forum, wiki, and other components—furthermore, course authors (see below) determine which course elements are visible or accessible to participants. More detailed information on the use of groups can be found in our help cards.
- Supervisors are registered to oversee a course or group and have extended rights within that group.
- Authors, or in relation to a course, (course) owners: have access to tools for creating learning resources (courses, tests, etc.), the corresponding member management including all associated learning groups, and course data generated by participants, such as test submissions and completed assignments.
- Guests do not have an OpenOlat account and are therefore not uniquely identified by the system; with this setting, people worldwide can access appropriately shared learning resources via the link. You also have the option to open only parts of a course for guests while keeping other parts restricted.
2. Course Overview
In your course overview in the authoring area, you can see which of your courses are visible to which among the users (Status) and by which release method access may be protected (Release):

Status:
In the Status column, you will see the entries "Published" and "Preparation" at the top. These are the two most commonly used statuses; access is thus granted to either all members of the course or only to the respective owners. In addition, the following other statuses are available:
Course status adjustable: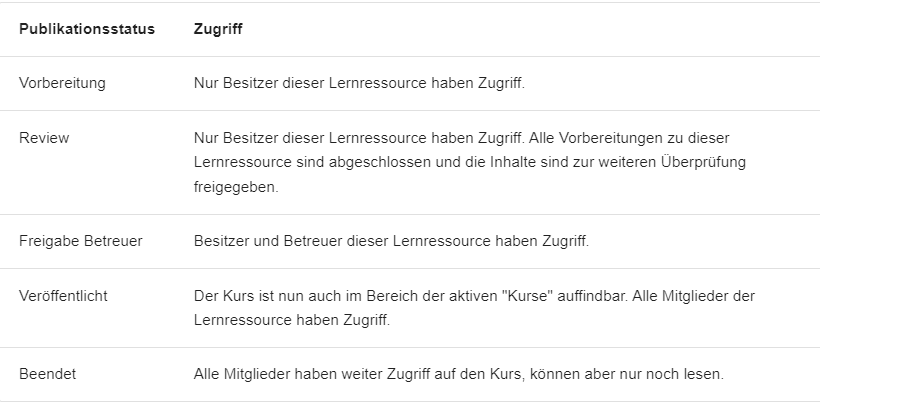
The course status can be changed at any time in the course: 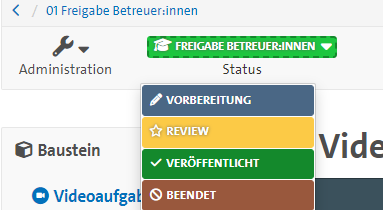
Here you will find more information about the course status.
Release:
The key in the Release column indicates that additional access restrictions exist; in this case, a course code, meaning that the course, despite being visible to all registered users, can only be accessed by those who enter the correct code. Therefore, the course is bookable for students.
You can change these settings at any time in the course under Settings, in the Release tab:
3. Creating a Course
Since OpenOlat version 17.2, there are three variants of OpenOlat courses: the conventional course (which will be discussed below and referred to as "Course") and two variants of learning path courses: the classic learning path course and the learning path course with progress. For more information on learning paths, please refer to this help card.
In conventional courses, course content is accessible independently, allowing for more flexible course management as well as work with groups.
Classic learning paths have a linear course structure, meaning that students go through course components in a predetermined order. In contrast, learning paths with progress do not have a fixed order. In both variants, each student has course progress that can be viewed by the instructors.
Existing conventional courses can be converted into learning path courses. During the conversion, a copy of the course is created. However, learning path courses cannot be converted back into conventional courses.
For more information on how to create a course using a template or without one, please refer to our help cards.
Alternatively, you can use one of the many course templates provided in the OpenOlat catalog and modify it to your liking. How to copy a template is explained below.
4. Creating a Course Copy
You can create a copy of your course at any time. If you create it from a blank template before the start of the semester, no further work is necessary unless the course design changes in the meantime. If you create the copy during the semester or after the course has concluded, it may be necessary to perform minor adjustments, such as deleting uploaded documents from material folders.
The following steps will guide you through copying a course.
To copy your course, select the appropriate menu option from the course administration:

- First, enter the title of the new learning resource according to the conventions of the program, for example:

Then, copy the course. This will create the new learning resource.
2. On the following page, you can update the info page of the new course for the next semester. If there are no deviations from the previous entries, only an adjustment under "Execution Period" to the following semester is necessary—your course will be automatically archived two months after the end of the period. This information is visible to the students on the course info page and can also be viewed by you in the course overview:

Additionally, you will see here that your new course copy is initially visible only to the course owner with the status: Preparation. If you have not added any additional co-authors yet, the course is only accessible and editable by you. Instructions on how to add more course owners can be found in the member management/participant management section described later.
5. Course Editor
With the course editor, you can add and remove course components, configure them, and change visibility and access settings (see also Visibility and Access). To do this, click on Administration in your course and then on the Course Editor:

6. How Do Participants Join My Course?
There are three ways participants can be added to your course:
Freely Accessible
Anyone with an OpenOlat account can enter the course. More details can be found in our help card.
Automatically via the Course ID
The course ID stored in STiNE can be linked with OpenOlat, allowing participants from the STiNE course to be automatically added to the OpenOlat course.
Note: Only students who have logged in to OpenOlat for the first time can be added automatically. Before the first login, individuals do not exist in OpenOlat because accounts are not created in advance for data protection reasons. Once the account is created, the person will be automatically added (even retroactively!). Instructions on how to set up access via the course ID can be found in our help card.
Using Defined Access Codes
Students gain access via a password that you should establish in advance and communicate to the participants. The following section explains how to set up this access method.
7. Course Access via an Access Code
With this option for course access, you utilize OpenOlat's internal feature that automatically prompts course participants to enter an access code, which you have previously established and communicated to the participants. The access code functions like a password for the course and will be requested before the course contents become visible.
You can also change existing access codes later using the method described below:
- After you have completed the creation of your course, navigate to the course administration under Settings, on the Sharing tab, to access the access configuration:

- There, in the section Access for Participants of the Organization, select the option Bookable and Open Offers. After saving, a new window will open; select the Access Code option there.
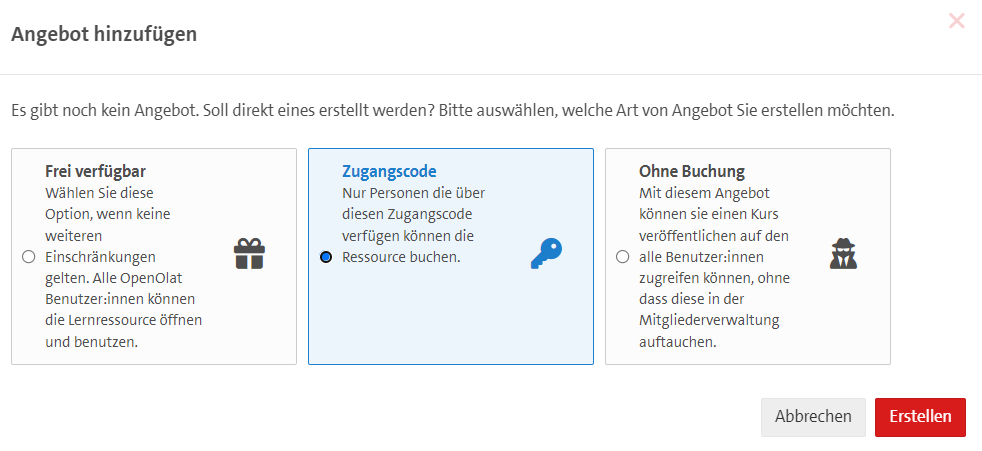
-
In the next step, enter a self-chosen access code and the booking period. You also have the option to include a description. Please keep in mind when choosing the code that it will be changed in unpredictable ways from semester to semester, so that subsequent cohorts cannot easily gain access to a previous event or vice versa.
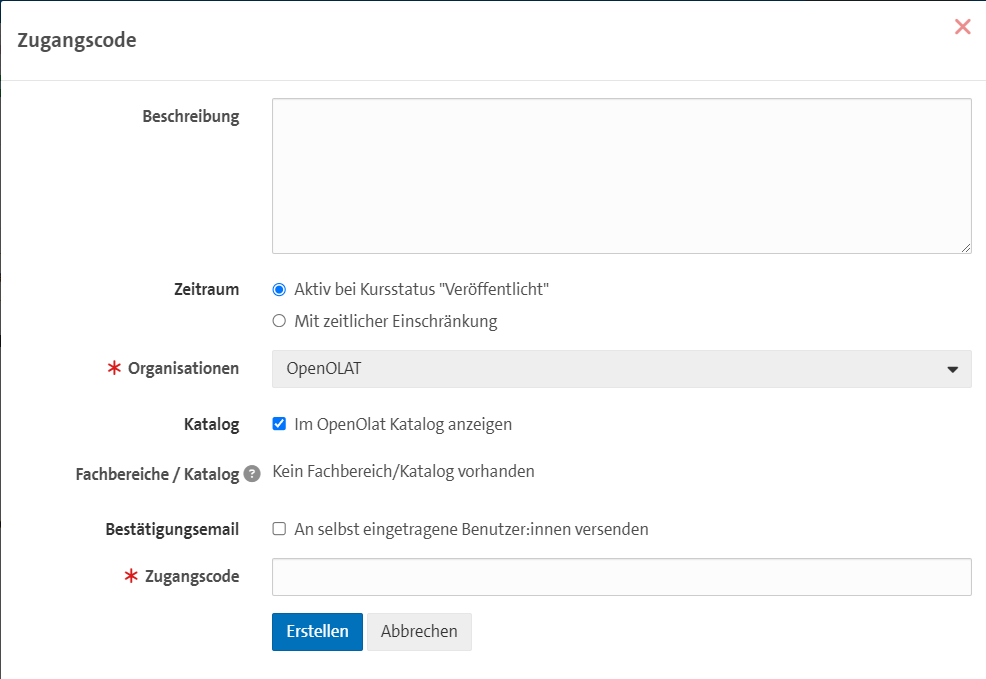
8. Publishing the Course
Once you have made the necessary changes to your course, you can publish them. By publishing, the changes will also be reflected in the participants' view of the course. To ensure that all course participants are on the same page, it is necessary to end the course and restart it. This will be done automatically by the system for all active participants in the course and will result in the interruption of current activities. For example, forum posts that are created at that moment will be lost.
Therefore, use the publishing feature carefully and communicate to your participants when you will be working on the course.
You can find the option to publish in the upper right corner of the course editor:
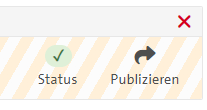
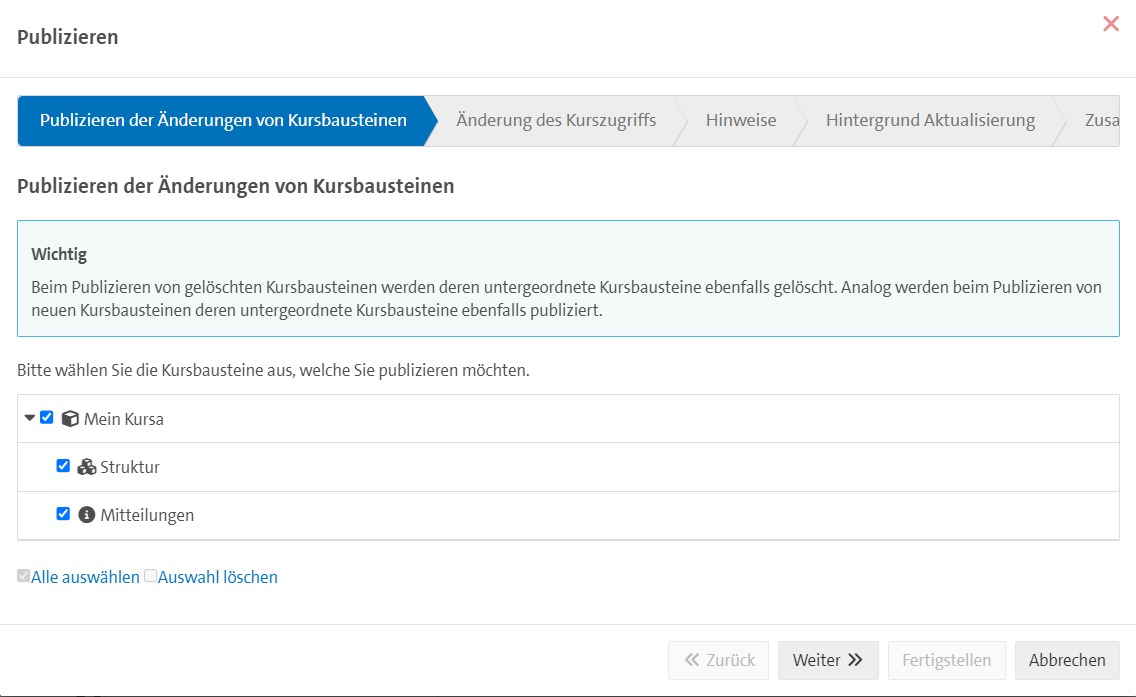
- In the first step, you will see all the course components in which changes have been made. You can select individual course components to publish them in their modified form while excluding others:
- You will then have the option to redefine the course access once again, for example, by setting up a course code. In order for students to see and use the course, select the Published setting when the course is fully prepared.
- In the third step, you have the opportunity to list your course in the course catalog of the University of Hamburg. Please ensure that you place the course in the correct section (faculty as well as degree program, if applicable). This will make the course more discoverable and display it in the context of other events.
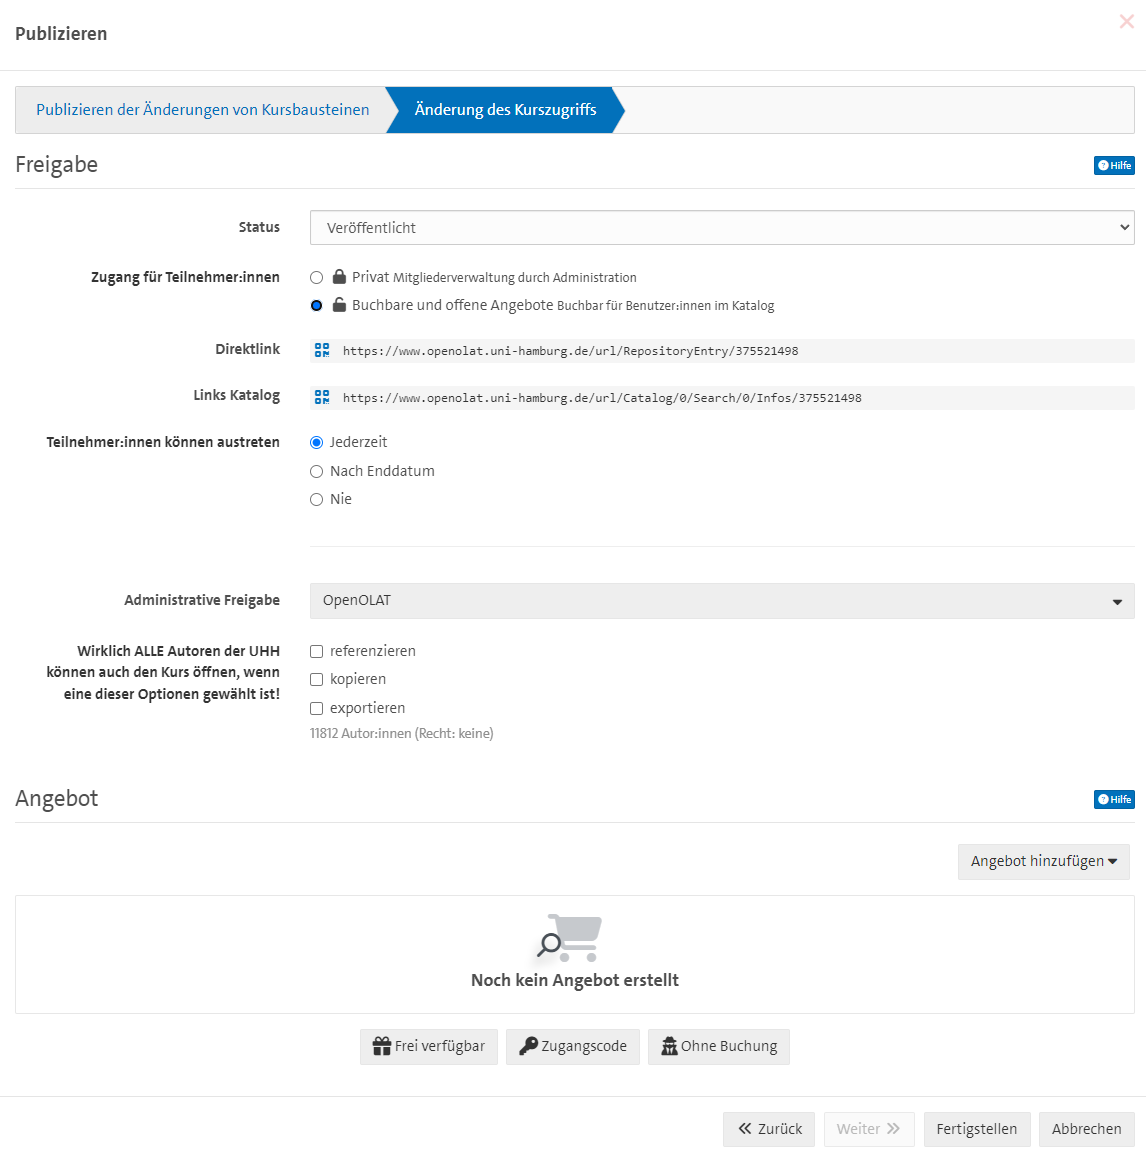
Once you have published the course using this method and potentially listed it in the course catalog, you can publish changes in the future by simply closing the course editor.
After making your changes in the course editor, close it by clicking the red cross in the upper right corner of the course editor toolbar:

- You will then be asked if you want to publish the changes. By clicking on Yes, manually, you will be taken to the publication options described above. By clicking on Yes, automatically, all changes you have made will be published, while the course access and the entry in the course catalog will remain unaffected.
9. Course Info Page
Each course has an information page with basic details about the course. You can find the link for your course on the corresponding information page, which you can access by clicking the Course Info button in the middle of the course toolbar:

On the course information page, you will find the external link provided. You can communicate this link to your students, for example, via email:

Anyone who clicks on an external OpenOlat link will be taken directly to the learning resource after logging in and, if not already done, prompted to enter the course code.
10. Who Can See My Course Content? Visibility and Access Configuration
To make traditional courses accessible only to your students or another target group, OpenOlat offers various options.
In this guide, you have already learned about enrollment via access codes.
Additionally, within a course, you can set further restrictions for individual course components based on date, group membership, or grades in other course components. You can find these options under the Visibility/Access tabs in the course editor:
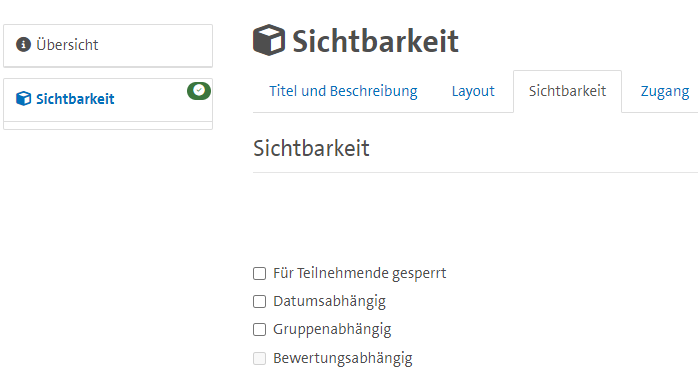
The options under both tabs are largely identical, although you will find additional options in the access settings for some course components, such as the forum component. A restriction on visibility always takes precedence over access, meaning that if something is not visible, it is also not accessible.
11. Checking Course Settings - Role Changes and Course Preview
You have the option to enroll yourself as a participant and, by switching, access and test the course from the participant's perspective. More information on this can be found in our help card.
If you are using the classic course design, you can verify whether your course or individual components are visible under various conditions by checking the course preview. You can access the course preview in the upper right corner of the course editor:
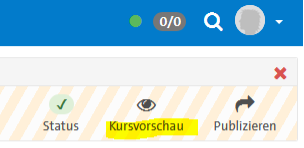
In the following overview, you will see the learning groups associated with the course and other setting options such as the date, allowing you to simulate the visibility of course components for specific groups on a given date.
If you create a course with a learning path or learning progress, you will not have a course preview, as the visibility of individual components depends on the individual progress of the participants.
12. Member Management/Participant Management
In the course, you can access a list overview of the individuals admitted to your course by navigating to Administration -> Member Management. There, you will see which participants have enrolled in your course using the access code and which other individuals are participating in your course in various. Additionally, you can add more individuals to the course by clicking on Add Member:

In the following dialog windows, you can also select the of individuals concerning this course (Participant, Tutor, Owner). Through the option "Import Members," you can add a list of student IDs or email addresses—however, the individuals must have logged in at least once to be added in this manner.
13. Creating a New Group within Member Management
In the member management section of a course, you can also create and edit groups associated with the course:
- Click on Groups in the left column within the member management section:

- A list view of all groups associated with the course will open. To create a new group, click on Create Group.
- Next, you can assign a name to the group you want to create and enter additional information, such as the group structure ("Last Names A-L"). By clicking on Save, the group will be created.
- After creating the group, the overview page for the group will automatically open. Here, you can assign the group to one or more courses (the group is already linked to the course through the previously mentioned methods) and add members. To add members, click on Administration and then on the Members tab.

- Scroll down to the bottom of the page to access the list view of the group members. Using the Add Member button, you can add an individual OpenOlat user, while the Add Members option allows you to add a whole list of OpenOlat users.
14. Ending or Deleting Courses
To maintain the clarity of your course list, you should either end or delete your course upon completion:
- End Course:
To do this, simply select the status "Ended" for the course.
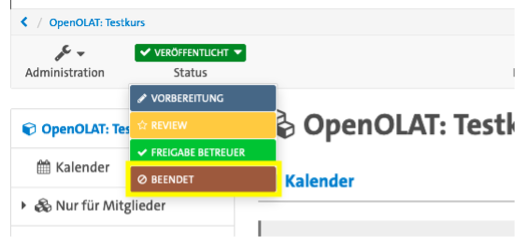
After ending the course, it is placed in read-only mode; participants can still access it and download materials, but they can no longer engage in any interactions, such as writing forum posts, uploading documents to shared folders, or taking tests. Course authors can no longer make any changes. New students cannot enroll in the course. A message is permanently displayed in the course: "This course has been ended and can no longer be edited or updated."
If needed, the course can be reactivated.
Courses are currently automatically ended two months after completion if a course period has been entered.
2. Delete Course:
To do this, select the action "Delete" under Administration:
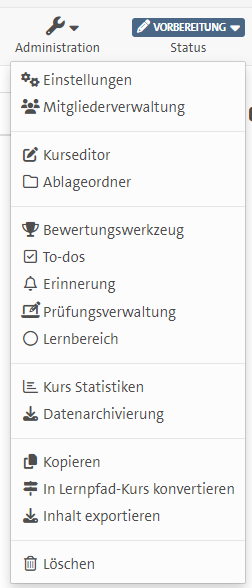
Confirm the deletion action in the subsequent window:

The course will be marked for deletion in the OpenOlat recycle bin; participants and authors will no longer have access to it. User data will be permanently deleted. Only system administrators have access to the recycle bin and can restore courses stored there or delete them permanently.
