Reuse Content
When working with CommSy over an extended period, you may want to reuse the content you have created multiple times without having to create new entries or repeatedly upload the same files from your computer.
You may also have created content that is no longer relevant this semester but should still be retained—as a reference for students before exams, for example. For these and similar scenarios, CommSy offers useful functions:
- Create Room Template: Share an entire room for content reuse; if needed, this can also be made available to other colleagues. When opening a new room, the template created by you can be selected, and the contents from the old room will be copied into the new one.
- Select Content: Duplicate content (announcements, events, materials, etc.) from one room to any other rooms.
- Deposit Content in "My Storage": A location accessible only to you for collecting, creating, and copying content, among other things.
- Open Project Room: Collect materials and other content in a project room opened for this purpose.
1. Create Room Template
Room templates are particularly suitable for courses whose content does not vary significantly from semester to semester, such as introductory courses. With the "Create Template" function, you can copy entire rooms instead of individual content entries.
Once a room template has been created, you can select it later when setting up a new project room. All content and settings from the existing room (excluding personal data) will be copied into the new room.
Creating a Room Template:
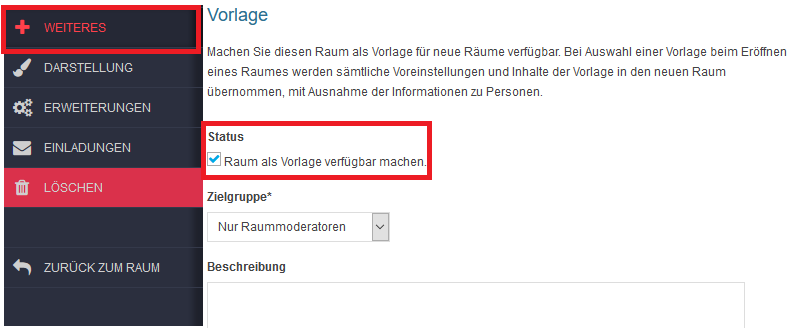
- Enter the desired project room and open the settings. In the left sidebar, select the menu item "More." Here, you will find the menu item "Template" further down.
- Now, in the form, check the box "Make Room Available as Template" (see Fig. 1) and select the "Target Group" from the drop-down menu below. This is the group of users who are allowed to use your template – either just you as the moderator of the "old" room, the participants of the room, or all CommSy users.
- You can enter a description of the template in the text field below to help you remember the type of content later.

Create New Room from Template:
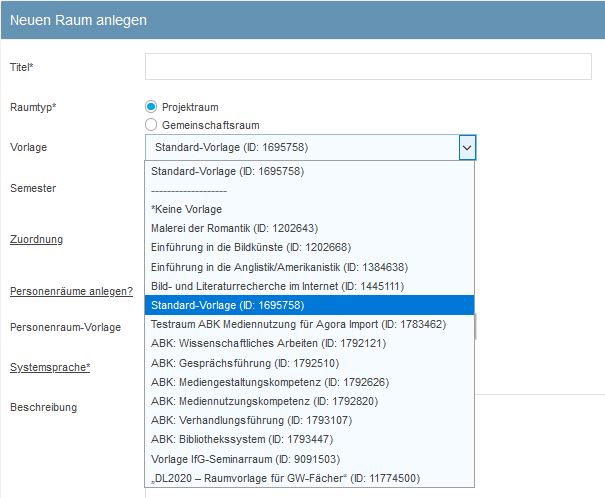
After you have saved the form, this template can be selected from the drop-down menu when opening new project rooms (see Fig. 2).

Of course, a project room that you create from a template can be edited as usual: you can delete or edit existing content and add new content. However, if you copy a room that has an access code, this setting will not be carried over. You will need to generate a new code so that the students can gain access.
| Note: If you create links within the room template (e.g., referencing a material entry in the "Welcome" post), these links will not be updated in the rooms created based on that template. Links within a project room refer exclusively to the original room. This issue only occurs with links within the room; external links and assignments will be transferred without any problems. |
2. Select Content
With the "Select" function, you can copy content entries from a project room (e.g., announcements, events, or materials) to the "My Selection" area in the CommSy sidebar and then paste them into other rooms (in the same section). This function will be explained in the following example using the "Materials" section.
| Note: The procedure is the same for the "Announcements" and "Events" sections. Entries from the "People," "Groups," and "Topics" sections cannot be copied. |
Selecting Content:
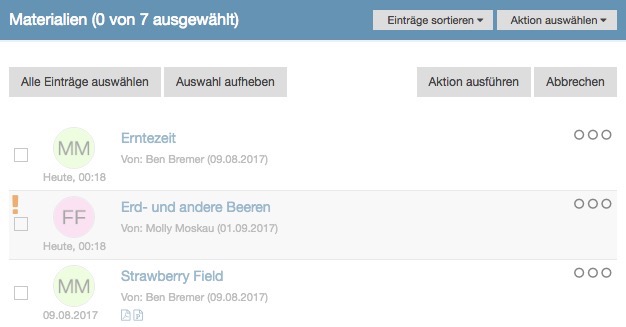
1. Enter the project room and open a section, in this case, "Materials."
2. In the upper right corner, under "Select Action," choose the action "Select."
3. Mark all desired entries with a checkmark in the box to the left of the title or click "Select All Entries" at the top.
4. Click on "Execute Action" in the upper right corner.

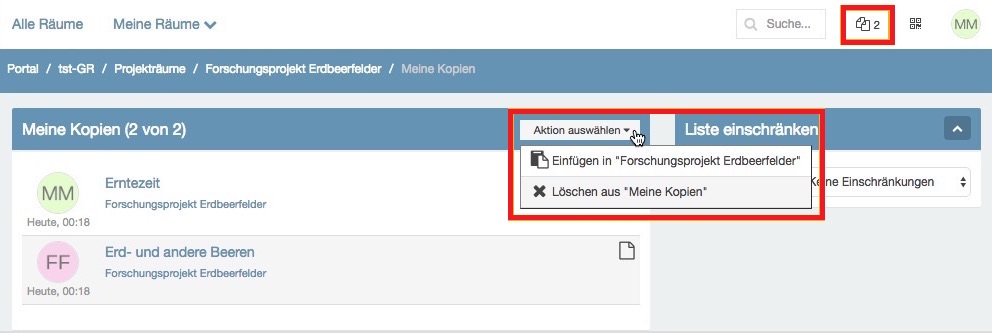
You will find your selections now in the CommSy sidebar, where you can open the "My Selection" menu by clicking on the corresponding icon (see Fig. 4). A small number next to this icon indicates how many selections you currently have saved.

| Tip: If you have opened a single content entry in the detail view, you can also add it to the "My Selection" area by clicking on the action "Select" at the top under "Select Action." |
Inserting Selected Content:
1. Switch to the room where you want to insert your selections.
2. Click on the "My Selection" icon in the CommSy sidebar (see Fig. 4). A list of your selections will now be displayed, sorted by project room and section.
3. From the drop-down menu, select the action "Insert into Project Room ...".
4. You can now select individual entries or all selections and insert them ("Execute Action").
The selections will be inserted and will now be available in the target room.

3. Deposit Content in "My Storage"
In the CommSy sidebar, you will find the option "My Storage." The dashboard is located at the top of the CommSy sidebar (the icon to the left of your profile). On this page, there is a list of sections on the left where you can create materials or other entries without them appearing in a specific room. You can attach files, embed media, and much more to the entries created here as usual.

Materials that you create in this area can be copied and pasted into other rooms as usual. This way, you can collect important materials in this space and retrieve them as needed (see Section 2: "Select Content").

| Note: You can share individual entries from your storage with specific individuals on CommSy to facilitate an easy exchange of files among fellow students or colleagues. Instructions on how to do this can be found in our FAQ: How can I share entries with specific individuals on CommSy and make them accessible? |
| Note: For more complex collections—or when it comes to collaboratively using a storage area—the storage feature has its limits. In such cases, it is advisable to open a separate project room for collecting materials and other content. |
4. Open Project Room
Of course, you can also open a new project room to store entries or use it solely for personal purposes. To do this, select the button "New Project Room" under "Create Room" (on the right) in the room overview as usual. Name the room, create it by clicking on "Save Settings," and use it as both a storage area and a personal space for your content. You can copy entries from this room and paste them elsewhere later if you wish.
For more information on creating a project room, please refer to the tutorial "Open Project Room."
